
Do you have orchid air roots that are out of control? You can grow a new plant from them!
Yes, you can propagate orchids from their aerial roots, and in this post we’re outlining the step-by-step instructions.
One of the most interesting and rewarding aspects of growing orchids is the ability to propagate them from aerial roots.
If you can achieve this, you can officially call yourself a master gardener.
This post contains affiliate links, which means I may make a small commission if you click through and make a purchase.
What Are Aerial Roots

First, we need to understand what an aerial (air) root is and why they’re important for orchids.
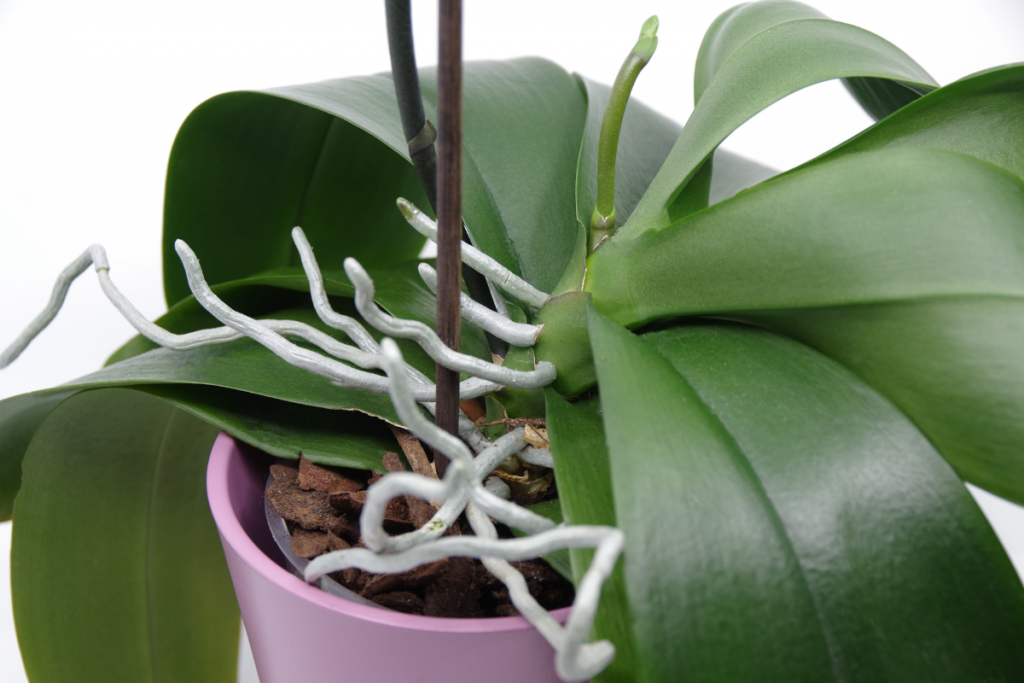
Aerial roots are a unique and important feature of orchids.
Unlike most plants, which primarily grow roots in the soil to absorb nutrients and water, orchids have evolved aerial roots that grow above the soil surface and play a different role.
Aerial roots are roots that grow above the soil surface and are commonly found in many orchid species.
They are not used for nutrient absorption, but instead serve to anchor the plant to its surroundings and absorb moisture and nutrients from the air.
Aerial roots are important for orchids for several reasons.
They Absorb Nutrients and Moisture
First, they allow the plant to absorb moisture and nutrients from the air, which is important because many orchids are epiphytic, meaning they grow on other plants, rocks, or other surfaces rather than in soil.
By having aerial roots, orchids can take advantage of the moisture and nutrients available in their environment, allowing them to survive in a variety of habitats.
They Help Stabilize the Plant
Additionally, aerial roots help orchids anchor themselves to their environment.
Because many orchids grow in habitats such as tree branches or rocky outcroppings, they need a way to anchor themselves to prevent them from falling or being blown away by wind.
Aerial roots grow and cling onto surfaces, helping to keep the plant stable and secure.
Helps with Growth and Survival
Aerial roots are crucial for the growth and survival of orchids as they absorb moisture and nutrients from the air through a special tissue called velamen.
This is particularly important for orchids growing in arid environments, where there is limited water in the soil, and in nutrient-poor soils.
The development of aerial roots allows orchids to adapt to these conditions and absorb water and nutrients from the air.
Additionally, in high humidity environments, aerial roots can utilize the moisture in the air to facilitate growth and survival.
How to Propagate Orchids from Aerial Roots

To propagate an orchid from aerial roots, you will need to follow several steps.
Step 1: Select a Healthy Parent Plant
The first step in propagating an orchid from aerial roots is to select a healthy parent plant.
Here are the key indicators that you have a healthy plant ready for propagation:
Strong, Vibrant Leaves
A healthy orchid will have firm, green leaves that are free from any spots or discoloration.
The leaves should be upright, and not drooping or wilted.
Robust Roots
Healthy orchids will have roots that are firm, plump, and free from rot or damage.
The roots should be a healthy white or green color, indicating they are actively absorbing nutrients.
New Growth
Look for signs of new growth on the orchid, such as the emergence of new leaves, buds, or spikes.
This indicates that the plant is actively growing and has the energy to support propagation.
No Pests or Diseases
Check the orchid plant for any signs of pests, such as spider mites or mealybugs, and diseases like root rot or fungal infections.
A healthy orchid should be free from any signs of infestation or disease.
Adequate Watering and Fertilization
Make sure the orchid is receiving adequate water and fertilizer.
Overwatering can lead to root rot, while under watering can cause the leaves to wilt and the plant to weaken.
Similarly, over-fertilization can cause damage to the roots and leaves, while under-fertilization can cause stunted growth.
Step 2: Prepare a New Container with Substrate
Choose a small pot or container with good drainage and fill it with a well-draining orchid potting mix, such as a mix of bark, perlite, and peat moss.
You can find orchid container for cheap on Amazon (like the one I’m using in the photo above).
Orchids require a well-draining medium that allows air to circulate around the roots.
A common medium for orchids is a mixture of bark, sphagnum moss, and perlite. This mixture provides excellent drainage and aeration for the roots.
Orchids also love growing in LECA. Read more about to grow houseplants in LECA here.
Step 3: Cut the Aerial Roots

Using a clean, sharp knife or scissors, carefully cut the aerial root from the parent plant close to the base of the root.
Choose an aerial root that is at least 6 inches long, firm, and free from any damage, rot, or disease.
The root should be actively growing and have a green or white tip.
Look for a node that is at least 1 inch away from the base of the aerial root and has a healthy, plump appearance.
The node is a thickened part of the aerial root where the new plant will emerge.
Hold the aerial root steady and make a clean, sharp cut just above the node using your sterilized cutting tool. Make sure not to damage the node or any nearby roots.
Tip: Make sure to sterilize the cutting tool beforehand to prevent the spread of any disease or infection.
Step 4: Gently Soak the Roots
Soaking the aerial roots in lukewarm water before planting can help to hydrate and prepare the roots for planting, as well as remove any debris or impurities that may have accumulated on the roots.
I like to mix in a few drops of hydrogen peroxide to help clean the roots and add a boost of oxygen (which is essential for growth).
Step 5: Plant the Cutting

Place the cut end of the aerial root into the prepared potting mix and gently add in more of the soil medium around the top of root to hold it in place.
Avoid tightly packing it in, but ensure that there’s enough soil holding it in place a few inches under the substrate.
Step 6: Care for Your New Cutting
After planting your orchid aerial roots, it’s important to provide proper care to ensure successful propagation.
Water the plant thoroughly, making sure the propagation medium is evenly moist but not waterlogged.
Provide bright, indirect light and maintain a warm and humid environment.
Regularly monitor the plant for any signs of stress or disease.
For the first couple of weeks the root(s) may seem like they’re unhappy.
This is because the plant has just undergone some stress from being removed from the mother plant. It needs time to adjust to its new reality – patience is key!
It will take up to several months before you start to see a new plant start to emerge.
For more helpful tips, check out my guide called Indoor Plant Care for Beginners: 15 Fail-Proof Tips for Success
More Orchid Posts:
Orchid Care After Flowers Fall Off (+ How to Trick Your Orchid into Reblooming)