
Monsteras are one of my favorite plants to propagate in water. The mother plant usually responds well to a haircut and cuttings take no time at all to grow roots in water (provided all the proper steps are followed).
Since they grow so fast, Monstera cuttings are perfect plants to give away to friends or even sell as starter plants.
They are also one of the easiest large houseplants that you can grow.
In this post I will take you through everything you need to know about how to propagate a Monstera, including instructional steps, what to expect and tips for success.
Monstera propagation is nothing to be afraid of, in fact – it’s one of the best beginner plants to learn how to grow cuttings in water.
This post contains affiliate links, which means I may make a small commission if you click through and make a purchase.
First, double check this list of essential plant tools to make sure you’re not scrambling for something when you’re in the middle of an important & delicate job!
Step 1: Find the Node on a Stem
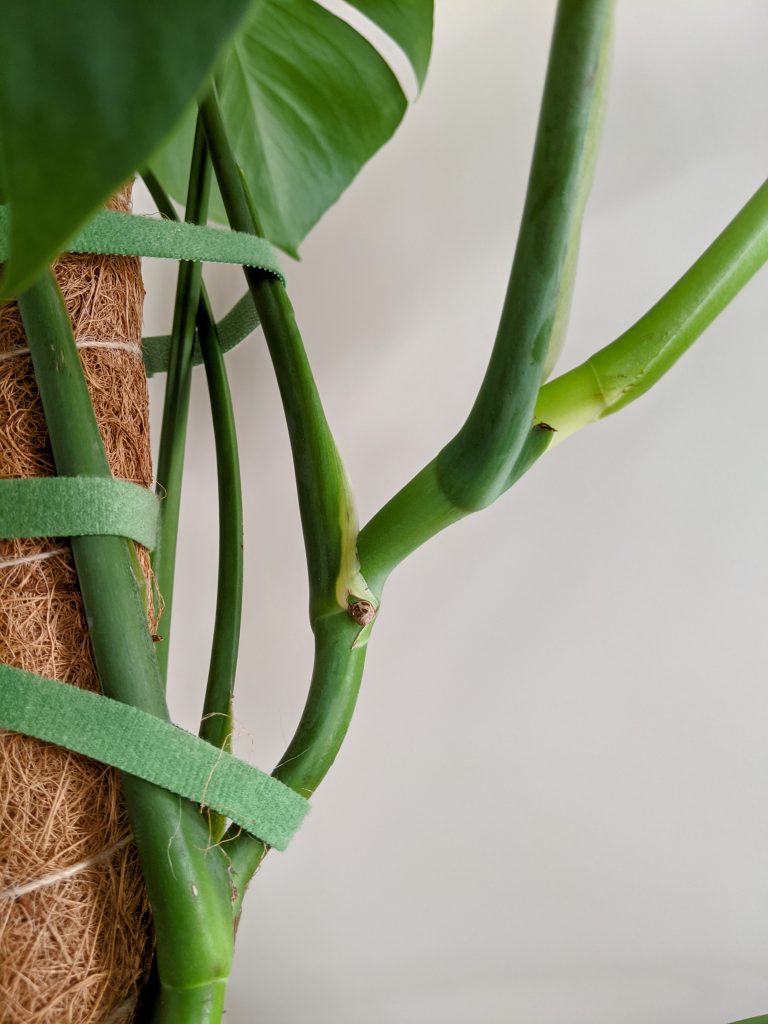
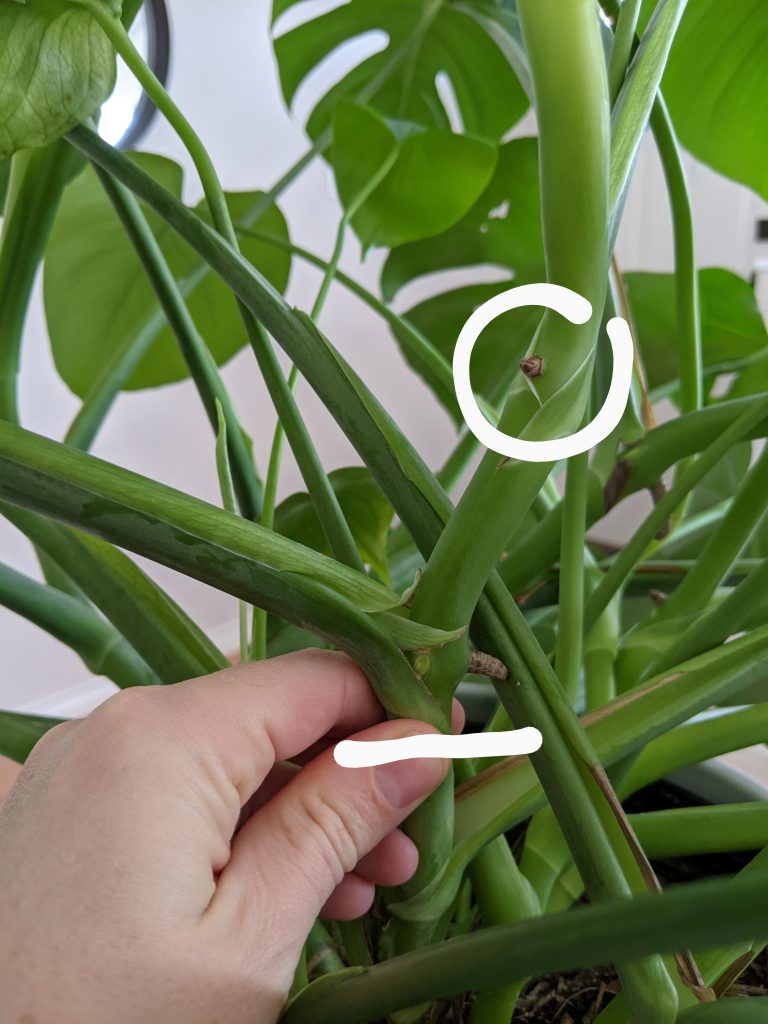
To take a cutting from a Monstera, you need to find a node. A node will be somewhere in the bottom two thirds of the stem.
There is usually a swollen area with a bump and sometimes an aerial root is already starting to grow out of it (looks like a little brown bump).
Nodes usually occur at an ‘intersection’ of two stems, which is another easy way to find a node.
Take very sharp scissors, shears or a box cutter to slice off a cutting about 2 inches below the node.
After taking your cutting, remove any other stems or sheathing from leaves growing.
Ideally you want one long stem and avoid any extra foliage to prevent unnecessary rotting.
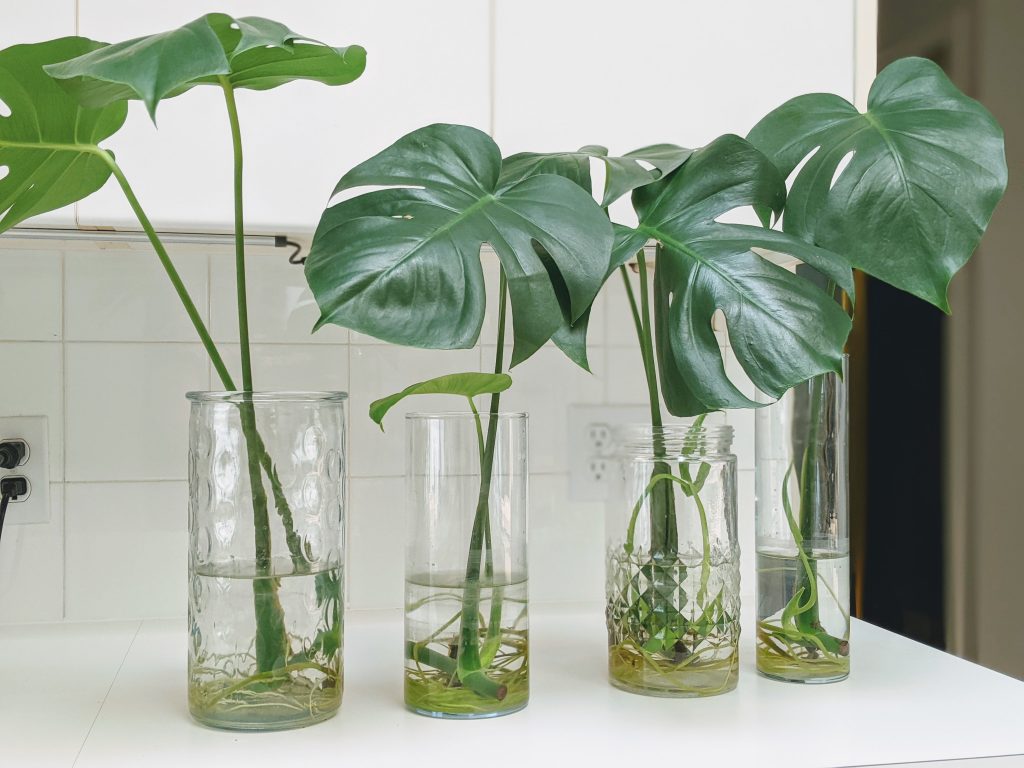
Step 2: Place Cuttings in a Jar of Water

After you’ve taken your cuttings and cleaned them up, let them air dry for about 10 minutes.
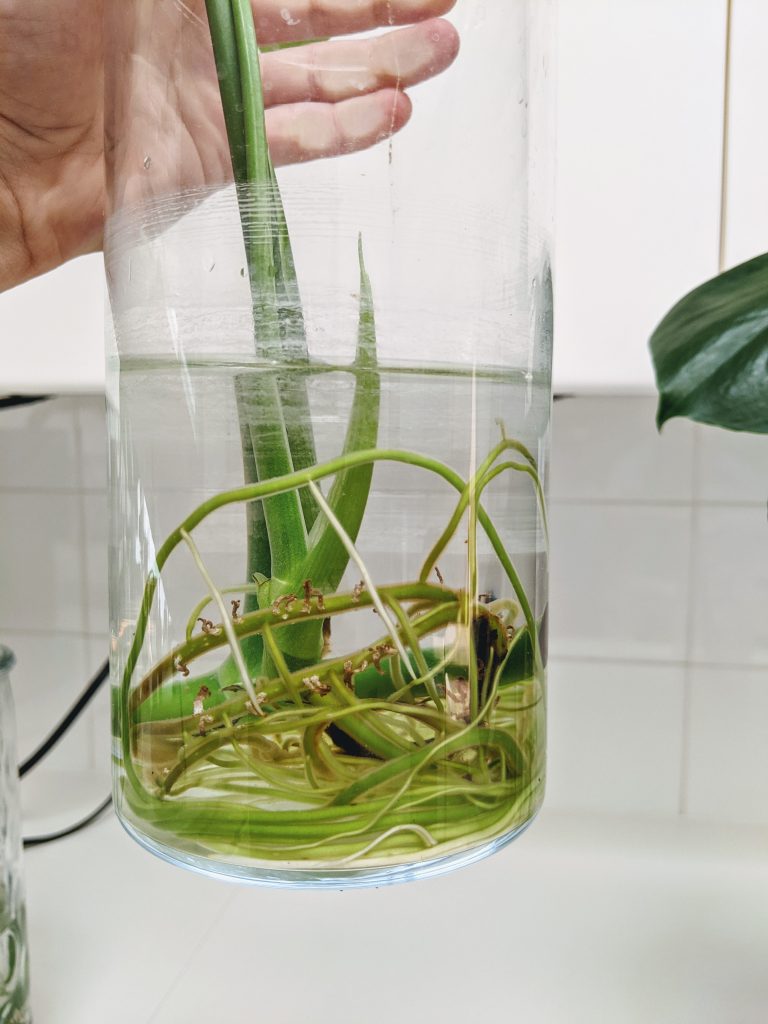
Then, place them gently in a jar and fill with water a few inches above the node.
Try to make sure the cutting is suspended and not squished into the side or bottom of the jar as this increases the chance of rot.
I like to use vases that have a wider base and a narrower opening like these ones.
This allows more room for the roots to develop and grow but keeps the stem upright.
Place your jar in a bright and sunny area (but avoid hot, direct sun).
The sunnier the location, the quicker your cutting will root.
Ideally you want to change the water at least once a week to keep everything healthy and in optimal growing conditions.
When I change the water, I also like to gently rinse off my roots in case there’s any rotting plant matter hanging around.
If you forget to change the water weekly, it’s not a big deal to let it go longer, but you should be topping it up with fresh water as you go.
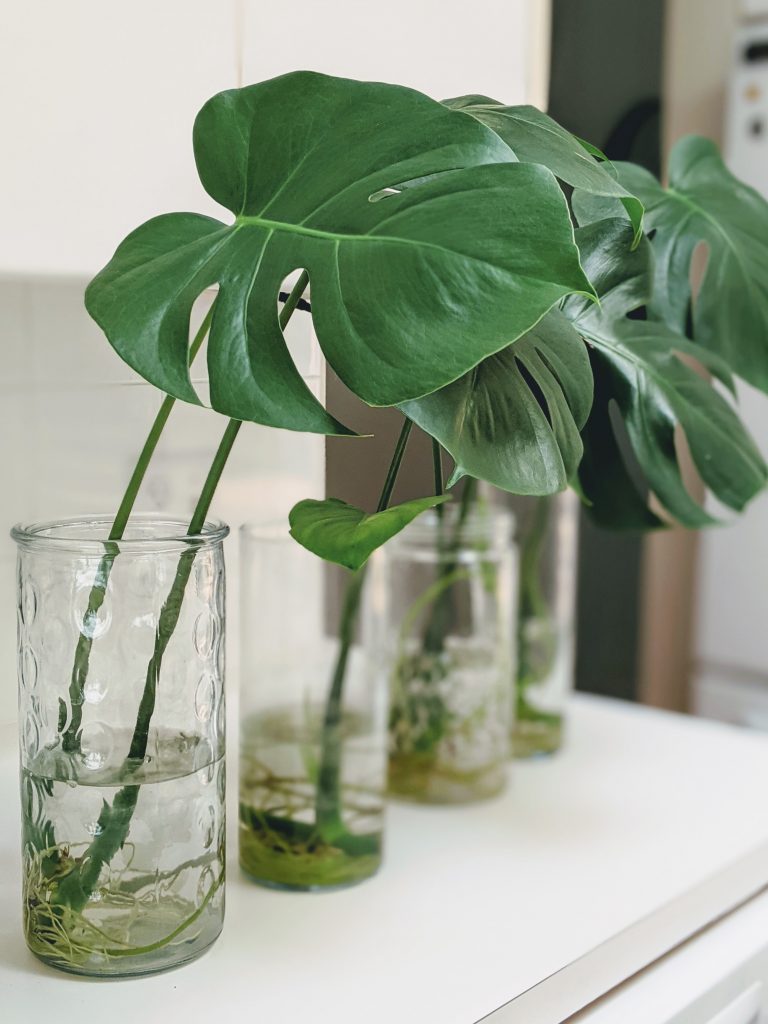
Step 3: Be Patient While Roots Develop
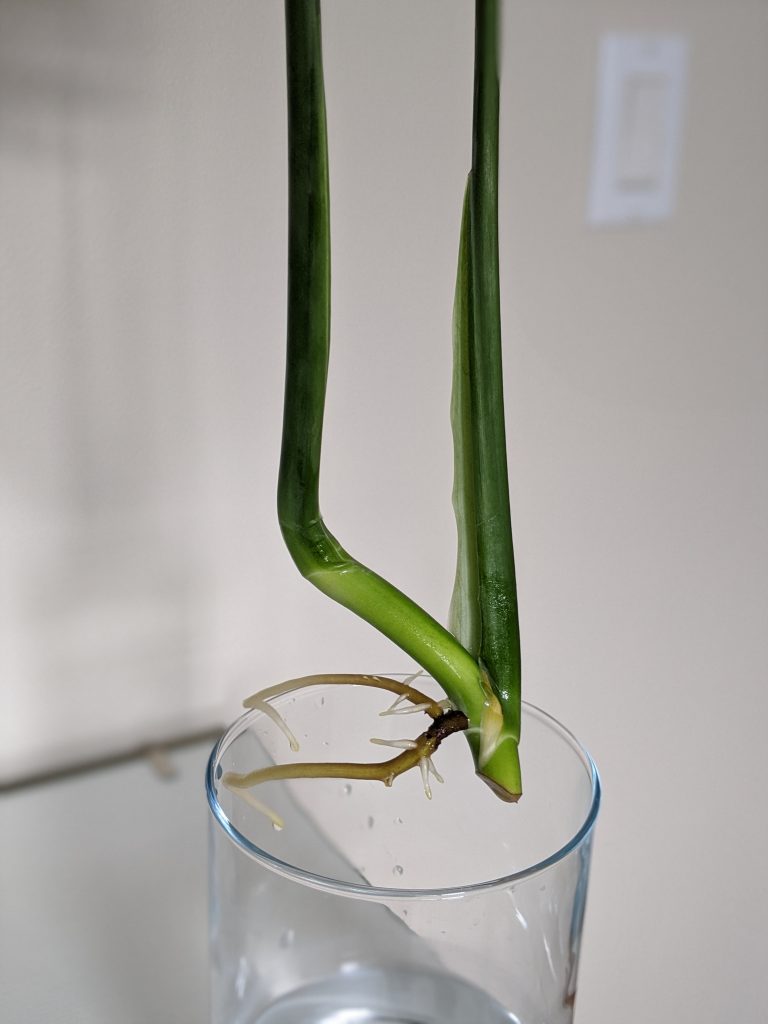

Expect to wait about 6 weeks before roots develop on your Monstera cutting before putting it in soil.
I usually recommend waiting at least 2-3 months to ensure a solid root system has formed for better chance of survival.
However, a Monstera can live in water for many months (if not years) as long as you change the water regularly, clean the roots and move the cutting into a bigger jar as it grows.
When there is a nice cluster of roots that’s filling up your jar, it’s ready to be planted in soil.
As long as you have about 5 roots that are several inches long, you can plant your Monstera cutting.
Keep the Roots Clean

While the roots are growing, keep an eye on them every week and don’t be afraid to snip off areas that look unhealthy.
As long as there are several healthy looking roots (white, yellow, light green, light brown), you can cut off roots that look like they’re rotting.
These are usually identified by being black, mushy or are much more slimy compared to the others.
>> Related: Propagating Pothos: Step by Step Guide (with photos)
Step 4: How to Plant a Rooted Monstera Cutting in Soil
You can move your Monstera cutting from water to soil after a couple months when several roots have grown that are at least 6 inches long.
Find a pot that’s a couple inches wider than the cluster of roots.
Fill the bottom of the pot with a little soil, and then gently place the rooted cutting in.
Then, lightly fill the rest of the pot with soil.
Make sure your pot has a drainage hole on the bottom.
Choose the Right Soil Mixture
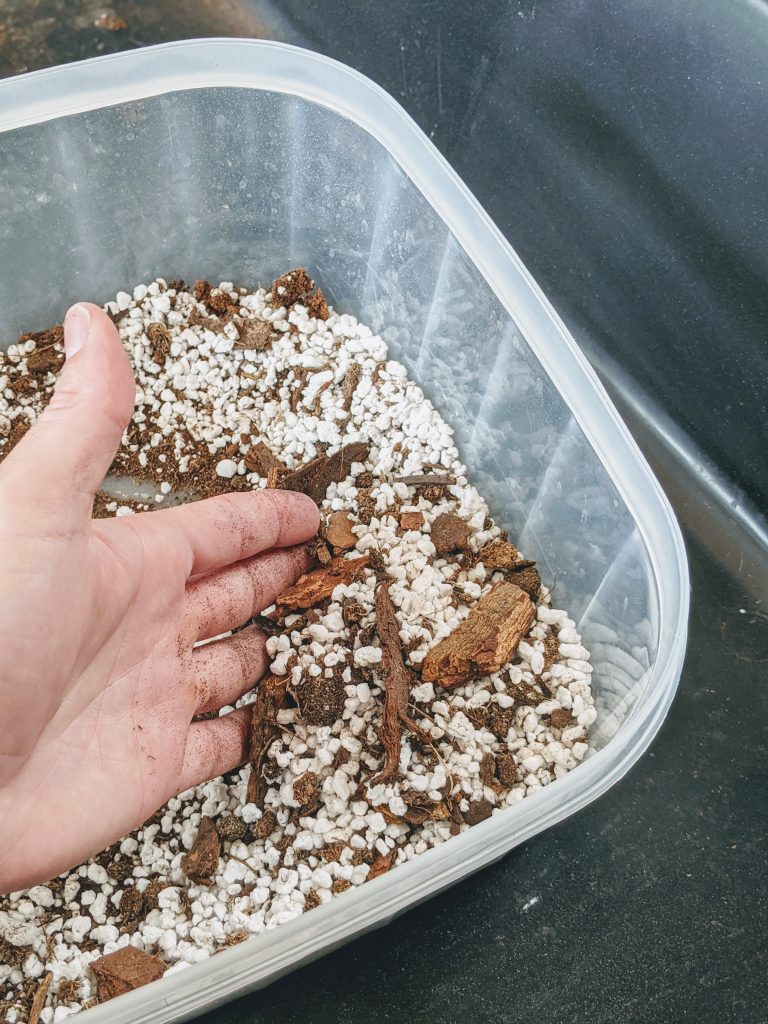

Since Monsteras are an aroid plant, they need light, airy and breathable soil.
The best way to achieve this is to use a mixture of regular potting soil, a handful of broken up orchid bark chips, coco coir, perlite and some organic matter (worm castings are the best).
Whatever you do, please do not buy Miracle Grow. It’s low quality and mass produced and has caused a lot of issues for plant lovers in the past year.
To make things easy, I recommend buying the highest quality indoor potting mix that you can afford.
Then add to it using some of this mixture of coco and perlite already to go in one bag.
Step 5: Monitor Your New Plant
When you first plant your propagated Monstera, it will likely go into mild shock.
It’s been very cozy living in water for the last few months so it will take some time getting used to living in soil.
Because of this, you’ll need to keep the soil lightly moist pretty consistently for the few few weeks.
I like to keep the water from the vase that the cutting was in and use that to water the plant.
Remember, the roots have been used to living in wet conditions 24/7, so dry soil will be too much of a shock.
Don’t keep the soil soggy, rather a light watering every few days.
If the soil stays wet for too long, you run the risk of root rot which is when fungus gnats show up.
The first week or two the stems and leaves might look a little droopy, and that’s ok.
It’s just a sign that it’s getting used to the change and should perk back up within a couple of weeks.
After a few weeks you should start to see new leaves sprouting!
If your newly propagated Monstera doesn’t seem to be doing well after a few weeks, the leaves are a telltale sign of what might be causing your plant problems.
Read more about why your Monstera leaves aren’t looking healthy.
Tips to Ensure Your Monstera Propagation is Successful
Propagate at the Right Time of Year
Spring is the best time (and probably only time) of year that you should take cuttings from a Monstera to propagate.
This is because it’s coming out of dormancy from the colder months and entering it’s strongest growing period.
This also ensures less of a shock to the mother plant.
You can have success propagating in the early Fall, but it might be a bit slower.
You Can’t Propagate a Monstera Leaf
Roots will only grow from the node and nowhere else on a Monstera, so you will not be able to grow a new plant from a leaf.
I’ve known several people who have a large, beautiful leaf that’s full of gorgeous fenestrations and try to propagate it; but they just chop it off at the base of the stem and hope for the best.
While it will look pretty in a vase of water, it won’t grow any roots.
You will have to find the node, which will look like an intersection in the stem with a brown bump.
If you can’t find any nodes on your Monstera, the plant might still be too young to propagate.
Place it in a sunnier location, crank up the humidity a little more and you should see nodes develop after a few weeks.
More Monstera Posts:
Why Your Monstera is Dripping Water (Guttation Explained)
9 Monstera Adansonii Varieties and How to Identify the Differences
How to Propagate Monstera Adansonii: 3 Ways & Tips for Each Method
Monstera Albo Care Guide: Easily Explained Tips for Success
Monstera Albo vs. Thai Constellation: What’s the Difference?
Stay Green!
Brush up on my best tips for indoor plant care for beginners and you will be well on your way to a jungle full of marvelous Monsteras!
Visit my Houseplant Toolbox for a list of all my favorite supplies & goodies!
Save a pin below to your houseplant board for future reference!

Thankyou , didn’t realise it was that simple, will give it a try.
Hi, following all the steps. The roots are coming out. Theyre so fresh and pretty. Waiting for them to grow a few inches long so I can pot it! Thanks!
Tried these steps and Roos started growing but are now getting a little brown and slimy. Is this normal? How can I fix this?
I would change out the water more often, probably every couple of days and see if that helps
My first time propagating and day 1 I’m noticing my leave are curling up, is this normal ? Would this be a result of hard water ?
It could be. You could try distilled and see if it improves. Also, if it’s only day 1, the plant is still in shock. In a week or two it should be adjusted.
Can I put my rooted monstera in soil during winter time?
Yes, as long as the root system is well developed. Also make sure it’s in front of a nice warm window with plenty of bright (ideally filtered) light.
Hello
I just got a monstera that was kept in water. I want to move it to soil but I’m wondering if I should wait when it gets warmer? I’m keeping it on a window sill so it is pretty chilly but that’s the only area with sunlight. In the morning there will be like an hour or two of direct sunlight. Are these conditions OK?? I’m afraid the plant will not survive.
Thank you thank you! My plant was my love but we had some heating problems in the house and it ‘died’.
Or at least I thought it did. I managed to get a very very small cutting and thought there was no point but put it in some water anyway and now I have two leaves and have put it in a little pot, all your instructions worked so far 🙂
Thanks for the informative article! If I can’t get around to potting the cuttings, should I add fertilizer to the water?